By Thomas Leister
2024-09-06
https://blog.zero-iee.com/en/posts/dnsmasq-startup-error-with-systemd-resolved/
Thomas LeisterWe have written about the Quectel RM520N-GL 5G cellular modem before. Back then it was about setting up the software to establish a functioning Internet connection under Linux.
Now there is another article about the modem - but not because everything worked as intended straight away. Rather, this time we want to give you an insight into our daily struggle with and against technology. Because not everything that should work actually works in the end. Even if - as in this case - the electronics have already been used successfully in one way or another.
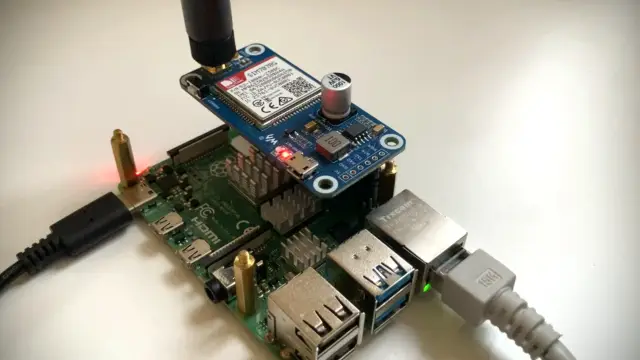
We took a closer look at the “Waveshare SIM7070G Cat-M/NB-IoT/GPRS HAT” for the Raspberry Pi and put it into operation. We uncovered various pitfalls and describe below how we set up the NB-IoT modem to connect one of our #AMPS nodes to the internet.
In our previous article we introduced the iptables firewall for our Wireguard VPN server. The firewall regulates which traffic is permitted between the individual customer VPNs and the management VPN and prevents access that poses a security risk.
Although it is possible to manage these rules using the iptables command line tools, it quickly becomes confusing and difficult to understand, especially for outsiders. We have therefore tested the firewall configuration using the “Shorewall” tool and found it to be suitable.
The ZERO AMPS Nodes do not have an internet connection by default, but in some cases we equip them with a mobile module so that we can update, maintain or troubleshoot them remotely.
To establish a secure connection to our own infrastructure, we mostly use Wireguard VPNs. Wireguard VPNs are very lightweight, perform well and experience has shown them to be very robust - especially in combination with mobile connections. The Wireguard client on the AMPS nodes connects to our central VPN server. Our developers also use this to establish a connection so that they can connect to the respective AMPS node.
Yesterday, while completing some of our AMPS units with display and Qt application, we encountered an error that caused the application to fail to launch correctly and crash in rare cases. The error looks like this:
During my work, I regularly connect to various computers and embedded devices that are accessible via an Ethernet connection. These could now be connected directly - like the development computer - to the company network…
… or you can create your own “lab network” for your devices, which is only accessible from your own laptop and over which you have full control. Advantages can be:
In larger companies, access to the internal company network may also be heavily regulated, so that only unlocked devices can be used at all. With an own small laboratory network on a second network interface, this problem can be elegantly circumvented.
Mikroelektronika (MikroE) from Serbia offers within its “Click” ecosystem numerous function modules that can be operated on microcontrollers. One of them is the “CAN SPI Click 3.3V” CAN controller module, which can be connected via the standardized “MikroBus” interface or SPI. To make the connection to a Raspberry Pi 4 work, we added the “Pi 4 Click Shield”.
In this post we will briefly explain how we got the CAN module working in conjunction with the Raspberry Pi 4.
On one of our Raspberry Pis with Raspbian “Buster” image we had a strange problem in combination with a USB mobile stick: The Wireguard VPN client could not connect correctly to the Wireguard server again and again when starting the Pi. The error log said that the hostname of the Wireguard server could not be resolved in the client configuration.
A possible cause for this could be that at the time the Wireguard server was started, the internal DNS resolver of the mobile stick (NAT/router operation) was not yet operational and resolution failed because of this. To confirm the theory and fix the error, a default name server should now be introduced, which is always the same regardless of the network connection and is available immediately.
On our odyssey in search of a 5G cellular modem, we have tried several modems from different manufacturers. Unfortunately, the commissioning was not always successful. Sometimes the driver support in the Linux kernel was completely missing - sometimes the control via NetworkManager / ModemManager was buggy or not possible at all.
Easy commissioning and stable operation are important to us. Since we do not want to use the modems on only a few devices, a manual adaptation of the Linux kernel is usually out of the question for us. The effort involved is too great and the consequences for the further life cycle of a product are too unclear. Therefore, the operating system - often a Raspberry Pi OS - should be used in its factory state and without major adjustments, if possible.
Two modems have emerged for us that work “out of the box” in combination with the current Raspberry Pi OS on Debian 11 “Bullseye” basis (kernel 6.1):